
 |
Glossary of Encoder Terms |
Absolute Measuring System:
- The measuring value is determined by reading information from a
scale, without counting. The measuring value is immediately
available after switch-on.
- Accuracy grade:
- Grade of quality, determined by the max. permissible measuring
deviations within a predetermined measuring range (e.g. 1m)
- Amplitude evaluation:
- Method of evaluating signals generated by dynamic scanning
(with carrier frequency): the amplitude variation of two alternating
voltages of the same frequency are used to determine the measuring value.
- Angle encoder:
- Angle measuring device, converts the shaft rotation angle into
electrical signals (can be incremental or absolute).
- Carrier frequency method:
- Scanning method used mainly with magnetic and inductive measuring
systems (see dynamic scanning).
- Direction discriminator:
- Part of a bi-directional counter which determines the counting direction.
- Distance-coded reference marks:
- Incremental measuring method, whereby the absolute position can be
determined by evaluating the systematically varying distances between
consecutive reference marks.
- Dynamic scanning:
- Scanning method by which two alternating signals of constant amplitude
and slightly different frequencies are generated and where the phase
between the two signals represents the measuring value.
- Eccentricity error:
- Measuring error of an angle encoder caused by an eccentricity in the
mounting of the circular graduation.
- Encoder:
- Apparatus consisting of a measuring standard and a scanning unit
(transducer, sensor).
- Gray code:
- Unit-distance code system in which only one code signal changes with
the transition from one measuring step to the next.
- Incremental measuring system:
- Measuring method by which the measuring value is derived by the
summation (counting) of increments (measuring steps).
- Integral coupling:
- Innovative angle encoder design with built-in coupling, located
preferably on the stator-side.
- Interferential measuring system:
- Photoelectric measuring system with a phase grating scale where scanning
signals are produced via the interference of diffracted beams.
- Interpolation:
- Method for producing measuring increments which are smaller than a
fourth of the scanning signal period.
- Measuring system:
- Consists of an encoder and associated electronics incorporating
interpolation, counter, readout and/or data interface.
- Modular angle encoder:
- Angle encoder, consisting essentially of disk and scanning unit
assemblies (rotor and stator) which are integrated into a machine
or a rotary table.
- Moire principle:
- Photoelectric scanning method to produce periodic signals using
two fine gratings which are closely positioned to each other and have
approximately parallel and equally spaced lines.
- Multiturn rotary encoder:
- Absolute rotary encoder which determines the angular position of the
shaft and the number of shaft rotations.
- Phase evaluation:
- Method of determining position by detecting the phase between alternating
voltages having a slight variation in frequency.
- Phase grating scale:
- Scale with step grating which diffracts the transmitted or reflected
light into 2 or more orders.
- Radian:
- Standard unit of angle: the angle at which the arc of circle has the
same length as the radius.
- Reference mark:
- Random graduation pattern which - when traversed over - produces a
signal peak, which may be used to determine an absolute datum within
an incremental measuring system.
- Reference pulse:
- Square-wave signal produced when the scale reference mark is traversed
over; normally one measuring step wide; may be used to define an absolute
datum within an incremental measuring system.
- Resolution:
- Measuring step, smallest digital unit of the measuring value.
- Resolver:
- Inductive angle measuring device, producing two alternating voltages
whose amplitudes or phases depend on the (shaft) rotation angle.
- Reversal error:
- Measuring error which results from approaching a position from different
directions.
- Scanning frequency:
- Response level which limits the velocity of an incremental measuring
system.
- Static scanning:
- Scanning method which generates periodic signals during movement; the
signal periods and fractions thereof correspond to a definite linear or
angular displacement.
- Systematic error:
- Reproducible measuring deviation, which can be compensated for by
e.g. computation.
- Torsional stiffness:
- Rotational rigidity of a precision coupling governing the reversal
error of a rotary encoder.
-
Incremental Optical Encoders
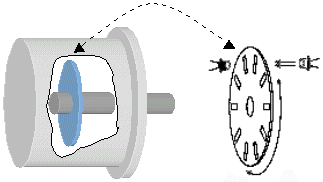 Optical incremental
encoders are linear/angular position sensors that use light and optics to sense
motion. Because optical encoders can provide position information at high
speeds, they are typically found in position and velocity feedback systems. For
example, optical encoders are often found in motion control systems, machine
tools, printers and plotters, material handling equipment and textile machines.
Most rotary optical encoders consist of a glass disk with equally spaced
markings, a light source mounted on one side of the disk, and a photo detector
mounted on the other side. The components of rotary optical encoders are
typically packaged in a rugged enclosed housing protecting the light path and
electronics from dust and other materials frequently present in hostile
industrial environments. When the disk rotates, the markings on the disk
temporarily obscure the passage of light causing the encoder to output a pulse.
The number of pulses generated by the encoder per revolution dictates the
resolution of the encoder. The resolution of encoders (their PPR, pulses per
revolution), typically ranges from a few PPR to as high as a few hundred
thousand PPR.
Because the markings on the disk are uniformly distributed, encoders always
generate a pulse in response to a known incremental move in position.
Subsequently, the position of an object can be measured by connecting the output
of an encoder to a counter that increments or decrements every time the encoder
generates a pulse. The value of the counter indicates the position of the object
quantized to the resolution of the encoder. That is, if an encoder generates 10
pulses per revolution, the resolution of the position measurement can be no
better than 1/10th of a revolution. The simple counter approach does have a few
drawbacks that are overcome by the Motion Capture card.
To detect the direction of motion and increase the effective resolution of
the encoder, a second photo detector is added and a mask is inserted between the
glass disk and the photo detectors (not illustrated). The two photo detectors
and the mask are arranged so that two sinewaves (which are out of phase by 90°)
are generated as the encoder shaft is rotated. These quadrature signals as they
are called are either sent out of the encoder directly as analog sinewave
signals or squared using comparators to produce digital outputs. To increase the
resolution of the encoder, a method called interpolation is applied to either or
both the sinewave or squarewave outputs. Interpolation typically results in an
increased encoder resolution of 2 to 25 times the fundamental resolution of the
glass disk. Direction is derived by simply looking at the timing of the
quadrature signals from the encoder.
A variation on the standard rotary encoder is the hollow shaft encoder.
Hollow shaft encoders are self contained encoders without a shaft. Instead of
coupling to a shaft to measure position, hollow shaft encoders simply mount over
the shaft to be measured. Subsequently, hollow shaft encoders eliminate the
resonance associated with couplings and simplify the difficulties of alignment.
Linear optical encoders sense linear motion. Linear encoders replace the
rotating disk with a stationary scale marked at equally spaced intervals. The
scale of a linear encoder can be constructed from glass, metal or tape (metal,
plastic...). The markings on the scale are read with a moving head assembly that
contains the light source and photo detectors. The resolution of a linear
encoder is specified in units of distance and is dictated by the distance
between markings. Linear encoders are available in lengths from several
centimeters to hundreds of meters and resolutions as low as a micron (or less).
The laser optical encoder is another type of motion sensor. Although these
devices use a different measurement approach internally, they offer the same
functionality as standard encoders. Laser optical encoders also provide
substantially higher resolutions at a higher price.
Of the variety of motion sensors available, encoders provide the best
accuracy and speed for a reasonable price and are readily available from
numerous manufacturers.
|
Interrupters, Photo-Reflective Sensors, Proximity and Hall Effect
Sensors
These sensors provide an indication of motion by sensing light, a
magnetic field, or simply the presence of an object. Their non-contact
nature affords convenient integration with existing mechanical systems.
For example, a photo-reflective sensor can be used to sense the position
(velocity and acceleration) of a rotating shaft by simply attaching
reflective tape to the shaft. As the shaft rotates, a pulse is generated
every time the reflective tape passes in front of the sensor. Although
these sensors typically only generate one pulse per revolution, MotionScope™
uses Edge Capture Technology which allows you to make high
resolution/accuracy measurements at any RPM.
|
Interrupter

Generates a pulse whenever an opaque object interrupts a light beam
passing across the gap of the sensor |
Photo Reflective Sensor

Generates a pulse whenever the sensor receives reflected light. |
Proximity and Hall Effect

Generates a pulse whenever the sensor comes in close proximity to an
object. Depending on the sensor, the object may or may not be magnetic. |
Laser Interferometer
Laser interferometers are used to measure the linear displacement of an
object. The Laser interferometer offers the best resolution for measuring
position providing accuracies up to 0.02 ppm and resolutions to 0.3 nm! Laser
interferometers use the length of a wave of light as the unit for measuring
position and consist of three basic components:
- A laser that supplies a monochromatic light beam
- Optics that direct the beam and generate the an interference pattern
- Electronics which detect and count the light and dark interference fringes
and output the distance information
Laser Triangular Sensors
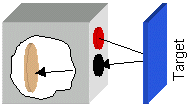 Laser
triangulation sensors are used to make non-contact linear displacement
measurements of an object and operate on the following principle: A laser beam
(typically from a semiconductor laser) is reflected off a target surface. The
returning beam is received and focused onto a CCD sensing array. The CCD array
detects the peak value of the light and determines the position of the target
based on the position of the beam spot. The sensor produces an analog voltage
(typically in the -10v to 10v range) that is proportional to the targets
distance from the sensor.
|
Magnetostrictive Sensors
|
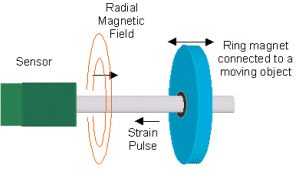 |
Magnetostrictive sensors are used to measure the
linear displacement of an object. Magnetostrictive sensors operate by
sending a radial magnetic field down a waveguide toward a permanent ring
magnet. The radial magnetic field pulse (which starts the measurement
process) is created when a current pulse is introduced on a coaxial wire
which exists inside the waveguide. The permanent ring magnet, which
slides over the outside of the waveguide, is mounted to the object being
sensed. When the radial magnetic field pulse reaches the permanent ring
magnet, the interaction causes torsional strain to be created. This
strain propagates back down the waveguide toward the sensor. Distance is
determined by measuring the time from the creation of the radial
magnetic field pulse to the arrival of the resulting strain pulse. |
|
Ultrasonic Sensors
|
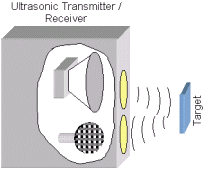 |
Ultrasonic transducers offer another means to make
non-contact distance measurements. An ultrasonic sensor works by
measuring the time it takes a sound wave to propagate from the sensor,
to an object and back to the sensor. Ultrasonic waves generated by a
transmitter are reflected by the target and the returning waves are
detected by a receiver. The measurement of elapsed time is used to
determine the distance to the object. The farther away an object is, the
longer it takes the sound wave to propagate. |
|
Cable Extension Transducer
|
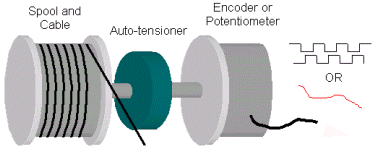
| A cable extension sensor couples a spool and cable to
an angle measuring sensor like an encoder or potentiometer. The angular
displacement measurement is used to determine the amount of linear
motion. A spring is used to maintain tension and to re-wind the spool.
When the spool is connected to a potentiometer, the output is an analog
signal representing the absolute position of the spool. |
 |
LVDT - Linear Variable Differential Transformers
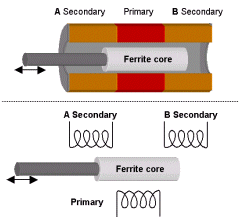 LVTDs are used to measure
the linear displacement and velocity of an object. LVTDs consist of a moving
shaft/ferrite material and a set of coils: one primary and two secondary coils.
In normal operation, the shaft is connected to an object and an AC magnetic
field is introduced on the primary coil. In the centered position, the magnetic
flux generated on the primary coil is coupled equally the secondary coils. In
this condition, the differential voltage on the secondary coils is zero. When
the shaft is moved from its centered position, more of the magnetic flux is
coupled to one of the two secondary coils. This results in a positive (or
negative) non-zero differential voltage. Using the polarity and magnitude of the
voltage, the position of the shaft can be determined.
Tachometer
Tachometers are used to measure the velocity of a rotating object.
Tachometers operate on the principle that a driven motor (a motor operated as a
generator) produces a voltage that is proportional to the angular velocity of
the motor shaft. The proportionality constant, K, that is used to translate
mechanical motion into voltage has typical values of 1 to 30 volts per 1000 RPM.


 Optical incremental
encoders are linear/angular position sensors that use light and optics to sense
motion. Because optical encoders can provide position information at high
speeds, they are typically found in position and velocity feedback systems. For
example, optical encoders are often found in motion control systems, machine
tools, printers and plotters, material handling equipment and textile machines.
 Laser
triangulation sensors are used to make non-contact linear displacement
measurements of an object and operate on the following principle: A laser beam
(typically from a semiconductor laser) is reflected off a target surface. The
returning beam is received and focused onto a CCD sensing array. The CCD array
detects the peak value of the light and determines the position of the target
based on the position of the beam spot. The sensor produces an analog voltage
(typically in the -10v to 10v range) that is proportional to the targets
distance from the sensor.
 LVTDs are used to measure
the linear displacement and velocity of an object. LVTDs consist of a moving
shaft/ferrite material and a set of coils: one primary and two secondary coils.
In normal operation, the shaft is connected to an object and an AC magnetic
field is introduced on the primary coil. In the centered position, the magnetic
flux generated on the primary coil is coupled equally the secondary coils. In
this condition, the differential voltage on the secondary coils is zero. When
the shaft is moved from its centered position, more of the magnetic flux is
coupled to one of the two secondary coils. This results in a positive (or
negative) non-zero differential voltage. Using the polarity and magnitude of the
voltage, the position of the shaft can be determined.