|
|
![]()

The scale and scanning unit of sealed linear encoders are protected against harsh machine shop environments by an aluminum housing with flexible sealing lips. These linear encoders are ideal for all manual and NC machine applications as well as all metal forming and wood working machines. The sealed linear scales come in several size configurations as well as lengths (over 30 meters for a single axis). Accuracy ranges from ±10 µm to ±2 µm. Reference marks come in standard or distance-coded versions.

Exposed linear encoders operate with no mechanical contact between the scanning head and the scale. This eliminates any mechanical backlash or hysteresis. The measuring standard for all exposed linear encoders is a phase grating applied to a carrier of steel or glass. Applications include high accuracy test and measurement machines, manufacturing machines related to the electronics industry, and ultra precision machines such as diamond lathes, and facing lathes. Several accuracy grades (to ±0.1 µm) and size configurations (lengths to over 30 meters) as well as standard or distance-coded reference marks are available.

HEIDENHAIN Digital Readouts are used for displaying linear and/or rotary position when used in conjunction with HEIDENHAIN encoders. DRO's are available with one to four display positions with resolutions from 10 µm to as fine as 5 nm. Typical functions available include distance-to-go, min/max display, program storage, RS-232-C output, tool memory, datum shift, and graphic help screens to name a few. DRO's are typically retrofitted on manual metal-cutting and metal forming machines, measuring and inspection machines, as well as electrical discharge machines.

HEIDENHAIN RETROKIT digital readouts can be retrofitted to knee mills and lathes. Regardless of specification, size or whether you're installing on new equipment or retrofitting machines already in operation, HEIDENHAIN offers RETROKIT Digital Readouts (DRO) to improve machine accuracy and parts precision.

Rotary encoders serve as measuring sensors for rotary motion, and for linear motion when used in conjunction with mechanical measuring standards such as leadscrews. Areas of application include: electrical drives, machine tools, printing presses, woodworking machines, and robots and handling devices. HEIDENHAIN rotary encoders convert rotary motion to electrical signals by photoelectrically scanning DIADUR circular graduations. The measuring signals are evaluated either in numerical controls (NC) and programmable logic controllers (PLC), or simply in a digital position display unit. Thanks to its wide range of mechanical and electronics features, the HEIDENHAIN rotary encoder program offers the suitable rotary encoder for virtually any application — from simple positioning tasks to the highly dynamic control of electrical drives.

Angular Encoders provide system accuracy as fine as ±0.4 arc seconds. These encoders are, therefore, ideal in applications such as rotary tables on machine tools, indexing tables, swivel heads, antennas, observatories, scanners, and measuring equipment. Several different mechanical variants are available to accommodate mounting configurations. Angular encoders are provided with shaft or hollow through shaft with integral coupling. Modular angular encoders are also available for mounting directly on a spindle.
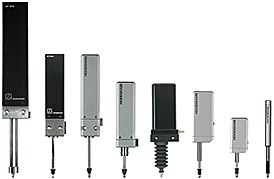
METRO Digital Length Gauge Systems are used for precise length measurement of single components and work pieces in the shop or in measuring laboratories, for inspection machines and NC machines, or for position readout with X-Y tables, and translation stages. They also serve as position encoders in automated production facilities and testing stations, among others. METRO comes in various measuring ranges, (from 12-101 mm) and are available in accuracies of ±1µm, ±0.5µm, and ±0.2µm.
CERTO gauging system is HEIDENHAIN's high accuracy gauging station for measuring high precision components, and as a calibrating device for special purpose machines and gage blocks. The accuracy of the CERTO system is ±0.03 µm, and is available with a 25 or 60 mm measuring range.

Machine tool builders and operators need measuring systems that provide detailed information on machine accuracy with a minimum of time spent on mounting and adjusting. HEIDENHAIN offers three measuring systems that meet these requirements: The KGM 182 grid encoder for circular path, irregular path, and dynamic tests, The DBB 110 double ball bar system for circular test with large radii, and the VM 182 comparator system for measuring position accuracy and guideway error on linear axes. Also available from HEIDENHAIN is the ACCOM software for measurement evaluation which is used in conjunction with all three measurement devices. ACCOM supports WINDOWS 95/98 and 2000/NT 4.0.

HEIDENHAIN offers a wide variety of straight cut controls with four axes measuring, and contouring controls for up to nine axes. HEIDENHAIN controls feature dialog prompted conversational programming, and full color graphics capabilities. CNC controls are used for milling, drilling, and boring machines, as well as EDM's, large machining centers and lathes. Also available are controls offered with complete integrated drive control, motors, and digital drives. Accessories include 3-D touch probes, and digitizing software.

3-D touch probes from HEIDENHAIN were conceived for use on machine tools - particularly for milling machines and machining centers. 3-D touch probes help to reduce setup times, increase machine utilization rates, and improve the dimensional accuracy of the finished workpieces. Setup, measuring and inspection functions can be conducted manually or - with most NC controls - under program control. The trigger signal is formed by an optical sensor, which functions without wear, and is very reliable.

